Most active topic starters
| JohnW | ||||
| Admin drgaz | ||||
| barker | ||||
| 3hundredspartans | ||||
| adespin | ||||
| fender | ||||
| collector1967 | ||||
| steve9e | ||||
| laurpat | ||||
| oldskoolpulsar |
Top posting users this week
| No user |
Who is online?
In total there are 3 users online :: 0 Registered, 0 Hidden and 3 Guests None
Most users ever online was 237 on Fri 17 Sep - 12:50
Latest topics
Conversion to led lighting
Page 1 of 1
 Conversion to led lighting
My Townmate is a 3 speed / 6Volts one.
I always had problems with the lighting specially the winkers in the flush volume, but also in their operation because they had no fixed operating time, although the old flasher is electronic type and not an old style with metal contacts.
This is mine flasher unit


So I started working or with various accessories.
So initially I bought 4 flashlights with LEDs made in China and 4 lamps .... cost about 10 euros.

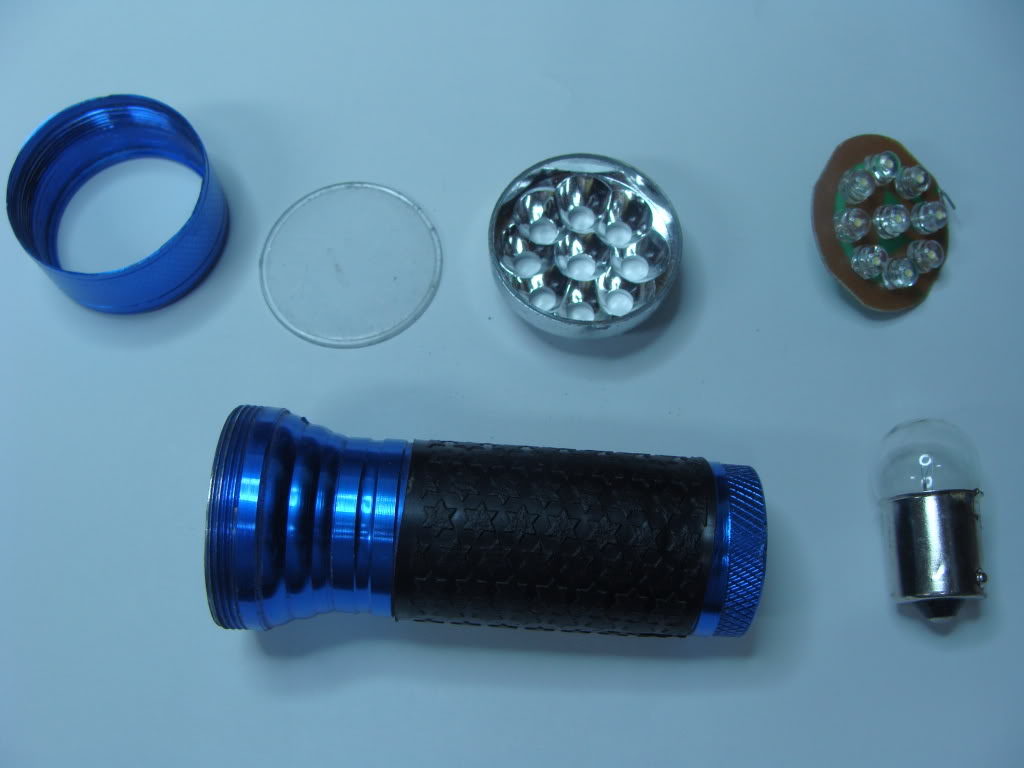
Each flashlight consists of the following pieces.

Breaking down the lamp .... and in her suite in the pin (+) using a Soldering iron and warming we open a hole ...

Then prepare a duct round surface which will then be placed on the Led Board we remove from the lens. The plastic surface is manufactured by cutting a piece from a scarce material called ... plastic box

This round plastic piece is placed just above the led on the Board without any glue and prevents the metallic surface of the lamp to come into electrical contact with the PCB of led

Eventually stick with Soldering iron two wires. One for the (+) in the center and a one at perimeter for grounding.
The center cable will pass through the hole of the shell aperture of the lamp that we already have pierce and the other will soldering iron in metallic housing of the lamp.

Construction takes this form ...

Here you can see the led light powered at 6 Volts. Τhe construction as compared to the normal bulb brightness. In this photo I use the leds and pcb from the flashlight.


To build I don't used the led that existed on the flashlight board.
I removed these and placed the classic high brightness 5 mm led. I also did not use the flashlight pcb , I posted the new leds directly to the mirror's holes and just joined the connectors at the same time.(all the (+) together and all the (-) together)
These leds work on 3 volts and need maximum current of 20 mA.
Because the number of led's was 9 couldn't link by two in order to upload the working voltage to 6 volts.
So the I linked all together and manufactured a voltage regulator with the well-known lm317 integrated that lowers the voltage from 6 to 2.8 volts.
Due to the use of voltage stabilizer brightness itself remained unchanged, although the charging voltage of the battery varies from 6.3 to 7.5 volts.
I use these hand made lamps for back winkers


To be continued ....
I always had problems with the lighting specially the winkers in the flush volume, but also in their operation because they had no fixed operating time, although the old flasher is electronic type and not an old style with metal contacts.
This is mine flasher unit


So I started working or with various accessories.
So initially I bought 4 flashlights with LEDs made in China and 4 lamps .... cost about 10 euros.

Each flashlight consists of the following pieces.

Breaking down the lamp .... and in her suite in the pin (+) using a Soldering iron and warming we open a hole ...

Then prepare a duct round surface which will then be placed on the Led Board we remove from the lens. The plastic surface is manufactured by cutting a piece from a scarce material called ... plastic box

This round plastic piece is placed just above the led on the Board without any glue and prevents the metallic surface of the lamp to come into electrical contact with the PCB of led

Eventually stick with Soldering iron two wires. One for the (+) in the center and a one at perimeter for grounding.
The center cable will pass through the hole of the shell aperture of the lamp that we already have pierce and the other will soldering iron in metallic housing of the lamp.

Construction takes this form ...

Here you can see the led light powered at 6 Volts. Τhe construction as compared to the normal bulb brightness. In this photo I use the leds and pcb from the flashlight.


To build I don't used the led that existed on the flashlight board.
I removed these and placed the classic high brightness 5 mm led. I also did not use the flashlight pcb , I posted the new leds directly to the mirror's holes and just joined the connectors at the same time.(all the (+) together and all the (-) together)
These leds work on 3 volts and need maximum current of 20 mA.
Because the number of led's was 9 couldn't link by two in order to upload the working voltage to 6 volts.
So the I linked all together and manufactured a voltage regulator with the well-known lm317 integrated that lowers the voltage from 6 to 2.8 volts.
Due to the use of voltage stabilizer brightness itself remained unchanged, although the charging voltage of the battery varies from 6.3 to 7.5 volts.
I use these hand made lamps for back winkers


To be continued ....

Duckrider- Posts : 253
Join date : 2014-06-08
Age : 64
Location : Athens
Page 1 of 1
Permissions in this forum:
You cannot reply to topics in this forum
 Gallery
» Headlight adjusting
» Old member back again
» Indicators stopped working
» johnW - Moderator
» New Mikuni T80 carbs
» Buying from Greece
» Replacement front shocks for T50 & T80
» West Country Newbie